Friday, January 8, 2016

Book Review - Hand Tools by Aldren A. Watson


HAND TOOLS
THEIR WAYS AND WORKINGS

Aldren A. Watson
First Edition 1982, Paperback 2002 reviewed
W.W. Norton & Company, Inc.
ISBN: 0393322769

     At first glance this book is quite unassuming with its beige color and a seemingly simple illustration of a block plane on the cover. Let me say, this is just a front and does an excellent job hiding the huge amount of quality content throughout. Mr. Watson brings every ounce of his artistic talent to the artwork in this book, it’s of a quality I haven’t seen in a very long time. He was a prolific sketch artist during his lifetime and in this case coupled that talent with his love of all things woodworking.

     Looking at the table of contents you can immediately tell it covers nearly every hand tool you will run across in any shop from the humble hammer to complex combination planes. Some of the chapters, such as those that discuss hammers, mallets, screwdrivers and pliers are naturally small but in several cases I learned something that I didn’t previously know. An example of this is a mallet made by wrapping hide in a circle then attaching a handle to it. I have seen these before but his exploded view allowed me to envision how it’s made.

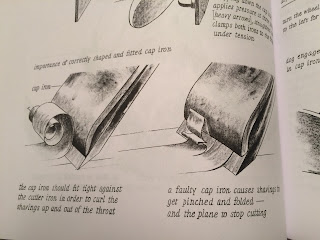
     Other chapters, such as that on saws, have illustrations that lend themselves to creating that “light bulb” moment for people. It can be difficult to explain the difference between a rip and a crosscut saw tooth and this is where his picture is literally worth a thousand words. Another chapter like this is the one on hand planes, the picture that shows what an improperly tuned chipbreaker does is perhaps the best I have seen. Throughout the book he doesn’t just tell you how to tune or use a tool, he shows you how problems manifest in the real world. In this case traditional pencil sketching trumps modern digital photographs.

     The last part of the book has several sets of plans, one of which is for a folding closet workbench which I would guess several people in apartments could take advantage of. The tool plans include ones for a bench hook, shooting board, hold downs, a mallet and my personal favorite, full size saw handle templates.

     Given that this book was first published in 1982 I partially expected it to be outdated as to the tools it dealt with. That’s the furthest thing from the truth, every tool in there is something we buy and use today. Not only is that a testament to the author choosing wisely but it’s a testament to the longevity of these tools.

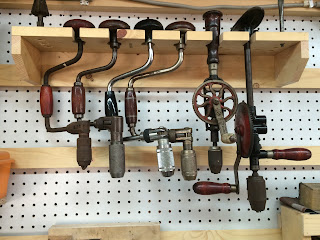
     This book has been on my woodworking wishlist on Amazon for quite some time, and I must say, I wish I had purchased it years ago. Had I done so many of the questions that I searched and searched and searched for would have been answered in a jiffy. As an example: what the number on auger bits means. Today I know that it’s the size in 16ths but years ago (before the Internet) that took forever to find out. 

     For those of you that have been using these tools for years there is the risk that you will know 90% of what’s in this book. For you I say this, isn’t that 10% worth it? And even if you don’t get a ton out of it the artwork alone allows this book to sit on the coffee table for nearly any audience to read.

     For those of you that are new to unplugged woodworking & hand tools, this should be the next book you buy. For anyone new getting into unplugged woodworking this should be book #1 in their collection.

So, do I recommend it? Absolutely yes. Many pictures below.


Tuesday, January 5, 2016

Cleat and pegboard shop storage


For quite some time, probably years, I've been experimenting with ways to keep my shop organized. I really hate not knowing where something is and wasting time that I could be doing something productive on finding a chisel or screwdriver. I think I've almost achieved perfection... First, the basic requirements for this storage system.
  • Cheap - use off the shelf big box materials.
  • Simple - the components need to be easy to make, install and maintain.
  • Flexible - as my needs and the shop change, it needs to change with me rather than against me.
  • Strong - hold as much weight as physically possible, ideally it'd be able to hold me.
  • Standard - all of the components should be standardized so any accessories can be easily made.
To achieve this I came up with a system that uses French cleats and pegboard. I've been using various types of cleats to hold things up for quite some time, mostly in the house so I started using them in the shop. Pegboard because I have years worth of pegboard hooks and I'm not going to throw them away (or garage sale them, sorry).
 
The first thing is to build a 2"x2" frame that the pegboard and cleats will be secured to. I used plain old 2"x2" pieces from Menards since they're right around $1 for an 8' piece. For the "standard" part of the requirements I, like any other woodworker, made jigs. 
 
 
The first ones you want to make are simple, cut a few 2"x3" pieces to 6 5/8" long. Yes, it's just a piece of wood but it counts as a jig. Really. Now, take a marker and write that length on it because you'll forget what it was. These are the pieces i'll use to separate the 2"x2" frame that i'm going to make. So... On to making a frame.
 
 
I pulled out the stud finder and marked the locations of all the studs on the wall. Then, using a level, I drew a line top to bottom the entire length of that stud. These are the points where i'll screw the frame to. Then, as you can see above, all I did was build a simple frame, starting with the left and right sides then ran 2"x2" pieces between them. I used those 6 5/8" setup pieces to make sure they're all the same distance apart working top to bottom. The clamps are handy for those crappy warped $1 2"x2" pieces I got. I didn't take my frame all the way to the bottom, I figured that would be occupied by foot space and such so I planned on using just the pegboard there.
 
 
I repeated this process all the way around your shop as far as I wanted to go. In this case I did one corner to start with. After that's finished I cut pegboard to fit and installed it all the way around with a 16 gauge nail gun. There's no need to screw the pegboard up, nails are fine, the cleats will hold it up in the end.


Now, I grabbed a store bought 1"x4"x8', set the table saw fence to 1 1/4" from the blade and tilted it to a 45 degree angle. That 1 1/4" is exactly half of that 1"x4" with the blade at 45 degrees. The flat part of this piece also happens to be exactly the thickness of a store bought 2"x2" (since they're not 2").
 
Run the whole 1"x4" through the saw so there are (2) 8' pieces, get some help if necessary. Or some roller stands, your choice. They're now "cleats".
 
Small cleats
An 8' piece 
 
Starting at the top of the pegboard, screw the cleat to the first 2"x2" so the 45 is the only bit exposed, I made yet another jig to help me line up the screws evenly across the board.
 
The screw jig
 
To make sure you're hitting the next 2"x2" in the frame I made another little jig to set between the cleat pieces. They're just scraps of 1"x4" and are the same pieces I'll use when I install cleats on the accessories. And again, grab the market and label them, you're going to use these for a LONG time.
 
 
Then you're guaranteed they'll all line up on the 2"x2" all the way down.
 
 
Repeat that installation over all of the 2"x2" framed pegboard and that's it. You'll be able to use the pegboard with the hooks you already own and can start adding cleated accessories over time. 
 
When you're spouse asks what you're doing out in the shop just say "cleating on you"... 
 
Or you're the worlds best cleater...


I've made all sorts of accessories for these, just flip the cleats over and use those same 6" spacers. Here are some ideas.